OK so it turns out modifying the texture from the dx9 sdk sample was ridiculously easy. It took me about 5 minutes to read the SDK documentation and figure out what I needed to do. First step was negating the texture from even being mapped to the tutorial's object, in this case, the cylindrical tube. This was done by modifying the d3dx9 device object's SetTexture call to use NULL instead of the g_pTexture variable.

The SetTexture call NULL'd out.

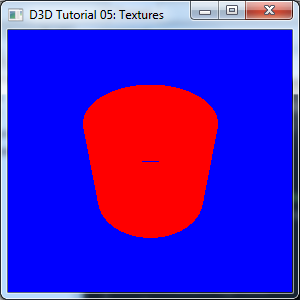
The original cylinder with it's texture (left) the NULL'd out texture (right)
As you can see that gave me the object without the texture, but there are still some colors applied to it (white/grey shading). I want it to be red. The next place I had to modify was the object's vertex buffer. In the tutorial the geometry of the cylinder is calculated along with the pixel's RGB value (denoted by the .color member).

The vertex buffer being built along with RGB assignment.
As you saw in the modification I did before, the top part was white, and the bottom darker. So I had to modify both color members by setting the RGB color to red (0xffff0000). So I saved those changes, recompiled and ran it again.
My red cylinder, created by modifying source.
So that was obviously easy, because well let's face it, I have the stupid source. If we had the source to all the games we hacked... we'll let's just say there'd never be a legitimate client, Ever. So let's see how this all works from assembly. First I need to get the layout of the assembly code; and for that I'll use IDA Pro.
Oh and one quick note I reset the values to the original ones and I built the example in 'Release' so I don't get debug symbols. (Although I still get a lot of extra information that'd normally be stripped from the executable prior to distribution).

The two color constant members in IDA Pro.
Since I can see the function names in IDA Pro, I quickly went to the InitGeometry function and found the two color property constants. I will need to modify these values to the red value. Which means I need to modify the values at 0x00001227 and 0x00001279 to load the 'red' color 0xffff0000 and not their current values. You may wonder why I didn't write 0x00401127 and 0x00401279. This is due to the way that windows loads executables. If you're not familiar with the terms Virtual Address (VA) and Relative Virtual Address (RVA) I strongly recommend you read this excellent post on stackoverflow. Or if you need some bed time reading you could always read the PECOFF documentation from Microsoft.
So I found the color constants, next up is the SetTexture call as I will need to NULL that out. That call is found in the Render function. IDA Pro was kind enough to show me which register gets assigned the g_pTexture variable. However, I'm sure I'll never be this lucky in real life. Otherways of figuring out which function call I need to modify is by looking for other constants around your call being referenced. You'll notice the call right after the SetTexture call (which I commented as such) has three constants and one register pushed: push 4; push 1; push 0; push eax. Going back to my source I can correlate this to the g_pd3dDevice->SetTextureStageState( 0, D3DTSS_COLOROP, D3DTOP_MODULATE ); call. How? D3DTOP_MODULE = 4, D3DTSS_COLOROP = 1 and the literal 0. But again, I have the source.. so whatever, just throwing that out there.

The SetTexture call that I need to NULL out.
So for the SetTexture call I need to modify the value at 0x000014E0 and set it to NULL prior to the mov into edx call. So I started up WinDBG and started the Texture.exe tutorial app. It immediately complained it couldn't find banana.bmp ( the texture) and quit. Scratching my head for a moment I realized I didn't set the 'start application from this directory' field. So I set it to: C:\Program Files (x86)\Microsoft DirectX SDK (June 2010)\Samples\C++\Direct3D\Tutorials\Tut05_Textures\Release\ and restarted it. After the target application loaded it hit the first chance exception. I opened a memory and disasm window, looked at Textures.exe's base address (in this case 0x013e0000) and added the RVA to it. So as you can see my memory/disasm window's point to 0x013e1227.

The base address and the color value in memory.
From here I could modify the values to red. Which I did.

The value modified to red (0xffff0000).
Now on to Render() to null out the pattern variable. This wasn't as straightforward as I originally thought.

The g_pTexture variable
Crap, I clearly didn't look too closely at the disassembly. It's a move edx, DWORD PTR [addr]. This is a small problem because I can't just set the address to 0x00000000. The reason is it will try to dereference that address. Since 0x00000000 is empty, the application will crash (null ptr anyone?). What I need to find is an address that POINTS To 0x00000000, or I can just set a breakpoint at 013e14e0 (where the mov instruction is) and null out the value that g_pTexture is pointing to after it is properly assigned it's original value.

Set the value of p_gTexture to NULL.

The red cylinder
As you can hopefully see, I made that cylinder my bitch. Granted this is still all very basic in the grand scheme of things, I'm just happy it didn't take that much time to figure out what I needed to do. So steps #1 and #2 are semi-done. Not bad for a few hours on a Saturday! Next up I should try the same techniques against a real object that's loaded from a mesh. That will most likely be a Lot harder.
No comments:
Post a Comment